|
Introduction
|
Session One: Introduction to Computers
|
|
|
Introduction to Windows
|
|
|
What is a graphical user interface
|
|
|
Controlling Windows
|
|
|
Using computer disks
|
|
|
Launching Applications
|
|
|
Working with Files
|
|
|
Filing structures
|
|
|
Computer Viruses
|
|
|
Changing Windows settings
|
|
Session Two: Spreadsheets and Excel
|
|
|
Introduction
|
|
|
Basic Excel techniques
|
|
|
Using formulae and Functions
|
|
|
Formatting – changing the appearance of worksheets
|
|
|
Basic charting
|
|
|
Advanced Functions
|
|
|
Using a worksheet for “database” activities
|
|
|
Worksheet construction
|
|
Session Three: Using Databases and Access
|
|
|
Introduction
|
|
|
Database basics
|
|
|
Creating a table and using forms
|
|
|
Reports
|
|
|
Relational databases and queries
|
|
|
Field validation
|
|
|
Labels
|
|
Sessions Four: Word Processing with MS Word
|
|
|
Getting started with Word
|
|
|
Finding your way
|
|
|
Basic styles
|
|
|
Formatting paragraphs
|
|
|
Other features
|
|
|
Finishing your documents and moving forward
|
Session One
In this session you will learn how to operate your computer,
store and retrieve your work and protect it against accidental damage. We assume
that you will be using Windows XP.
Operating systems and graphical user interfaces are special
computer programs that control all parts of the computer, including the screen
and the keyboard. Windows, a graphical user interface, was designed to offer a
helpful and intuitive way for you to control the computer.
In this unit, we begin by looking at what operating systems
are and what they can do. You then find out how you can use them for management
tasks including:
·
preparing disks
for use
·
setting up
structures for storing your data
·
controlling
elements of the screen display and the computer’s behaviour.
You need to be able to perform these tasks before you can do
any work with a program such as a word processor. By working through this unit,
you will be well prepared for the material in the rest of the module.
Objectives
By the end of this unit, you will be able to use Windows to:
·
format and copy
disks
·
create and manage
filing structures
·
control elements
of the screen display
·
run applications
(such as a word processing program)
·
load, store and
print information
·
use menus, icons,
windows and the mouse pointer, and use multi-tasking to run several applications
at once.
Versions of Windows
Windows is being developed all the time. This unit assumes
that you are using Windows XP. Windows XP offers some improvement over Windows
is being developed all the time. This unit assumes that you are using Windows
XP. Windows XP offers some improvement over earlier versions of Windows,
although you might not notice them whilst following this course . If you are
using Windows 95, for example, you will still be able to use this material
though you may notice very slight differences in the way your screen looks.
. If you are using Windows 98 you will still be able to use
this material though you may notice very slight differences in the way your
screen looks. Version 3.1 is substantially different and cannot be applied to
the work in this unit. If you are using a version prior to Windows 98, you
should upgrade to a later version.
Section 1
An Introduction to Windows
Introduction
A computer needs basic instructions in order to run at all.
For example, it needs to know how to interpret anything you type, and how to
display information on screen. It also needs to be told when and how to load a
program you want to use, and how to allocate its memory. These fundamental tasks
are performed by the operating system.
Many people find that an operating system is not particularly
easy to use. For this reason, a special type of program called a graphical
user interface, or GUI (pronounced ‘gooey’) has been developed. This
uses pictures and options you can choose from lists displayed on the screen.
Many people find it easier to use a GUI to communicate with the computer.
Windows is a GUI.
In this section we look at what the operating system does,
and why you need to know something about using it.
1.1 What is an operating system?
A computer operating system is a type of control system. It
manages the resources of the computer and tells it how to perform tasks. It also
gives you a means of communicating with the computer and giving instructions. As
such it forms an interface between you and the computer.
– The tasks the
operating system performs can be divided into three broad areas:
·
It controls how
the computer operates, including:
– displaying
information on the screen
– interpreting anything
you type on the keyboard
– reading information
from disks and writing to disks
– interpreting mouse
movements.
– You do not need to
know about these unless you make changes to the computer such as fitting a
different monitor or screen.
·
It controls the
allocation of memory or processing power to tasks.
– Using Windows, the
computer can run more than one program at a time, switching between tasks as
necessary. The computer does this on its own without any instructions from you.
·
It enables you to
communicate with the computer so that you can make it perform tasks and it can
give messages to you, telling you if you have made a mistake and answering your
questions.
– This is the function
of the operating system that you will concentrate on here.
1.2 Turning on your computer
It may not be immediately obvious how to turn on the
computer, and, once turned on, whether it is behaving correctly.
|
 Activity
1 Activity
1
|
Please note, most
computers will not start properly if there are floppy disks in the disk drives.
Therefore, before switching on your computer please ensure that all disk drives,
i.e. the slots in the front of the machine, are empty, including CD Drives DVD
Drives and Zip Drives.
Find out how to turn
on your computer. There may be a button on the front, side or rear of the main
box (which contains the computer’s ‘brain’ or Central Processing Unit).
You may have to turn on the monitor, i.e. the display, separately. Even if the
computer was turned on when you arrived, find out how to do this in case you
ever need to turn it on yourself.
1.
Describe here what you have to do to turn on the computer you are using.
2.
Describe what happens when you turn on the computer. Look out for
indicator lights, and anything on the screen display.
You may have to press a button and/or flick a switch in order
to turn on your computer. When you have turned on the computer it is likely that
the following will happen:
·
One or more
indicator lights will come on. One of these may be a disk indicator light, which
may flash to indicate that the computer is reading software from the disk
drives.
·
You will hear a
whirring noise as the fan starts up. The fan keeps the computer cool and helps
prevent it overheating.
·
You may hear some
noise from the disk drive as the computer reads a disk.
·
You may hear a
clicking or ticking noise as the computer performs a memory check.
·
The screen may
flash, and then briefly display some text. Often this will be too quick for you
to read. Do not worry if this happens most messages only confirm that the
machine is performing correctly.
The computer may immediately load Windows and show a screen
looking like Figure 1.
What ever happens when you switch on a computer
Don’t
Panic
Someone will be able to show you how to activate Windows on
your computer.
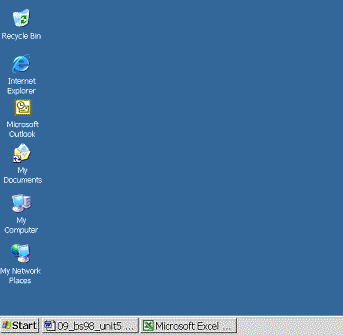
A screen similar to Figure 1 indicates that your computer is
running Windows correctly. You may find more, or less, on your screen depending
upon what software (i.e. computer programs) has been installed on your
particular computer.

Figure
1: Typical
Windows XP Desktop
1.3 What is a graphical user interface?
Unlike a traditional operating system, instead of requiring
you to remember and type commands, a GUI shows pictures, called icons, and lists
of options on the screen. This allows you to instruct the computer by moving a
pointing device around the screen and activating buttons rather than typing a
set of special commands. You type less, and make more use of a pointer and mouse
buttons.
Looking at a GUI
Windows uses screens such as Figure 2 to display information.
Figure
2: An open
Window
The main component of GUIs are:
·
Windows
·
Icons
·
Menus
·
Pointer.
From these, the acronym WIMP has been derived. You may see a
GUI referred to as a WIMP user interface.
Figure 2 shows a window a menu and some icons. Windows also
has a pointer that moves around the screen as you move the mouse, which is
beside the computer.
You can use the pointer to:
·
select icons
·
display menus
·
select an option
from a list.
Your main way of communicating with the computer using a GUI
is by moving the mouse and pressing its buttons to select what you want to do
with the icons and menu options. You will occasionally need to type something,
such as the name you want to give to some work you are saving, but you will not
need to type in specialised instructions for the computer.
Microsoft Windows is the name of the software package used to
control the machine. A ‘window’ is the name given to a rectangular object on
the screen. Both of these are often called ‘windows’. They can usually be
distinguished by the context.
SECTION 2
Controlling Windows
Introduction
With Windows you will be dealing with pictures (icons), menus
and dialog boxes rather than typing commands. You will make choices and give
answers by clicking on buttons and on items in lists of options. Once you are
proficient in the basics, you will use the same techniques in your continuing
work with disks and programs.
In this section you will learn about, and try many important
techniques you need in order to use Windows. You will continue practising these
throughout this unit so they will soon become familiar.
2.1 The Windows screen
The Windows screen is called a desktop and you will carry out
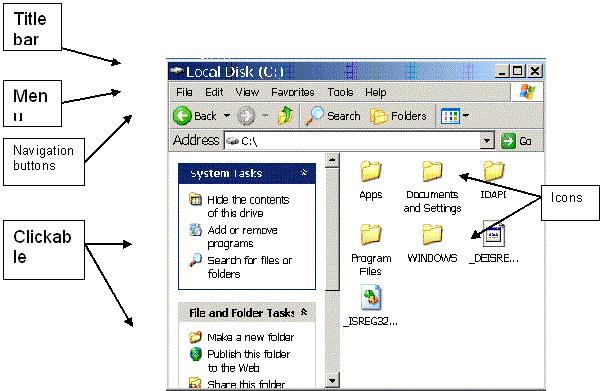
all your work on it. On the desktop in Figure 2 is a window with the title
`C:\`. First look at the parts of the window shown.
The title bar shows the name of the window.
The menubar calls up a menu relating to the window or the
files contained within it.
The minimise and maximise buttons let you alter the size of
the window easily, the close icon will close the window (see figure 3 below).
The icons within the window represent programs and work i.e. files stored on the
computer. The activities in the rest of this section will help you to explore
this window and its components, and find out about using Windows.

Figure
3: Minimise,
Maximise, and Close buttons
2.2 The mouse
You will be using the mouse a lot in your work with Windows
to point at, move and select items on the screen. The mouse can be set up for a
right-handed or left-handed person. If you are right-handed, you will use the
left button on the mouse; if you are left-handed, you will use the right button.
You will learn how to set up the mouse later on in the tutorial.
The mouse pointer
The mouse pointer, which moves on the screen as you move the
mouse with your hand, is an important aspect of using Windows.
2.3 Opening a window
Make sure you have a screen similar to that shown in Figure
1. If you do not, you may have several other windows on the screen.
If you have other windows, cluttering up the screen, you will
need to close them. To close a window:
Point to the close button
(the X in the top right of the title bar). Without moving the mouse, press and
release the left-hand mouse button.
When you are viewing the desktop as shown in Figure 1 move
the mouse pointer over the icon called My Computer. Press the left-hand mouse
button twice in rapid succession, this action is called double-clicking.
(If this did not happen you may have left too much time, or
moved the mouse, between clicks.)
2.4 Moving a window
You may sometimes want to alter the position of a window on
the screen. Moving and resizing windows are very common activities to arrange
the contents of the screen for convenience.
|
Activity
2
|
Move the mouse pointer
up to the title bar of the window. Now press and hold down the mouse button and
move the mouse.
You can see that the window moves around with the pointer for
as long as you keep the button pressed. When you release the button, the window
stops moving. This technique is called dragging.
2.5 Resizing a window
There are two ways of changing the size of a window:
·
dragging the
borders with a mouse
·
switching between
the current size and a maximum size.
Dragging borders to change window size
|
Activity
3
|
1.
Move the mouse pointer so that it is over one of the window borders. Draw
the new shape of the pointer in the space provided below:
2.
Next move the pointer until it is over one of the corners of the window.
What shape is it now?
3.
Move the pointer back over a window border at the side of the window. Now
what has happened?
4.
Then move the pointer onto a window corner again and drag the corner in
and out. What happens?
1.
When you move the mouse pointer over a window border, the shape of the
pointer changes to show that you can drag the border and alter the size of the
window. Over a side edge, the pointer changes to a pair of arrows pointing left
and right; over the top or bottom edge, it changes to a pair of arrows pointing
up and down.
2.
When you move the pointer over a corner of the window, it changes to a
pair of arrows set diagonally. This shows that you can drag the window corner in
and out.
3.
When you drag the window border, it moves with the mouse pointer until
you release the mouse button and the window is then fixed at its new size.
4.
When you drag a window corner, you can change both the height and width
of the window at once.
Now try another way of changing the size of a window.
Switching to change window size
|
Activity
4
|
1.
Move the mouse pointer over the middle button in the top right corner of
the window that shows a box with a bold upper line. This is called the `maximise`
button. Click on this by pressing and then releasing the mouse button. What
happens?
2.
Look at the button you just clicked on. What does it look like now?
3.
Click on it again. What happens?
1.
When you click on the ‘maximise’ button, the window is redrawn at a
larger size so that it fills the screen. This is its maximum size.
2.
At the same time, the `maximise` button changes, it now shows two
overlapping windows. This is called the `restore` button and shows that if you
now click on the button, the window will return to being ‘windowed’ on the
desktop.
|
Activity
5
|
There is a button with
a single line at the bottom next to the ‘maximise’ button. This is the
‘minimise’ button. Click on it now. What happens?
When you click on the ‘minimise’ button of a window, the
window shrinks right down to a button on the Taskbar at the bottom of the
desktop. This button represents the window and is labelled with the title and
the icon of the window you have just minimised.
|
Activity
6
|
Using the mouse, click
on the button you have just created on the Taskbar. What happens?
2.6 Using menus
Menus are an important feature of Windows. A menu is a list
of options from which you can choose tasks you want to do or settings you want
to make.
|
Activity
7
|
1.
Move the pointer over the word File in the menu bar. Now click the
mouse button. What happens?
2.
Move the pointer off the menu and onto the desktop. Now click the mouse
button or press the Escape key (marked Esc) on the keyboard. What happens?
3.
Next click in the menu bar on View, and move the mouse over
Arrange Icons. What happens?
4.
Minimise the window on the desktop as in Activity 5. Move the mouse over
the button on the task bar and press the right mouse button.
1.
When you click on a menu name in the menu bar, such as File, a drop-down
menu appears.
2.
When you click outside the menu or press Esc, the menu is removed without
choosing any options.
3.
You can click on other menu titles to bring up other sub-menus.
4.
Menus are available as a source of information or as a shortcut in many
areas of windows.
Figure
4: Menu
|
Activity
8
|
1.
Using the mouse, select the View option. Move the mouse over ‘Small
icons’ and click.
2.
From the view menu, this time click ‘Large icons’
3.
From the view menu click ‘List’
4.
From the view menu click ‘Toolbar’.
5.
Repeat step 4.
1/2/3 Using the menu you
have selected different ways of viewing the contents of a window.
4/5 It is also possible
to change the way that a window is displayed. Notice the check-mark next to the
word Toolbar on the menu to show whether it is displayed or not.
2.7 The Start button
On the left of the taskbar WindowsXP has a button called
Start, which is a shortcut to programs and recently used files.

Figure
5: The
Taskbar and Start button
|
activity 9
|
·
Click on the
Start button and view the menus and submenus.
2.8 Using the Help menu
Almost all windows applications, and Windows itself, provide
help systems, partly to give you an overall guided tour of how that particular
piece of software works but also to answer any specific queries you may have.
It’s a bit like having a book built into the computer.
|
Activity
10
|
1.
Press the Start button and select ‘Help and Support’
2.
Run the mouse over each of the icons on the menu bar. What happens?
3.
Click on ‘Windows Basics’ and then click on ‘Core Windows tasks’.
4.
Now click on ‘Working with files’ and read the list of help topics
that appear
5.
Click the ‘Index icon’ to see an alphabetical list of help topics
6.
Type in the keyword box ‘copy disk’
2 A description of what
each icon’s function pops up
3/4 Using the Help menu
and contents is a good way to get an overall introduction to the piece of
software you are using.
Index is an alphabetical
list of subjects covered by the Help system.
6 Instructions on how to
copy a floppy disk are shown
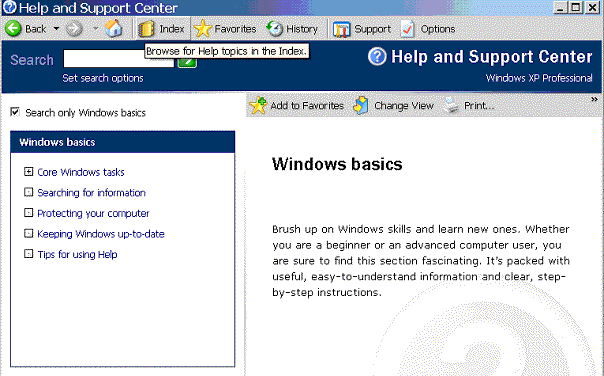
Figure
6: Search
window and its generated Help page
2.9 Using icons
Each icon in the display represents something:
·
a single item,
such as a file or computer program (including games).
·
a folder that
contains files and programs.
·
a shortcut to a
file or folder.
·
a computer
device, such as a hard disk, floppy disk drive, or CD Rom.
|
Activity
11
|
1.
From the Start button click on ‘Programs, then ‘Accessories’, then
‘Calculator’.
2.
Experiment using the new Calc program. Click on the numbers and symbols
using the mouse.
3.
Click ‘View’ and select ‘Scientific’.
4.
Click on the minimise button on the Calc window.
2.
When you double-click on the Calculator icon, a new window opens. The
original window remains on screen this time. The new window looks and works like
a calculator (see Figure 8).
The Calculator icon represented not a window but a computer program.. When
activated the calculator program displayed a window on the screen which has many
of the properties associated with the other windows you have worked with.
Programs running under Microsoft Windows always run within a window of their
own.
Figure
7: Calculator
window
You can use the
calculator by clicking on the buttons you want to use.
3.
When you use the sequence 6, 4, sqrt, the calculator works out and
displays the square root of 64, which is 8.
4.
When you click on the Minimise icon, the calculator shrinks to an icon on
the taskbar. When you click on the Calculator icon, the Calculator window opens
again showing the same numbers in the display as when you minimised it. This is
very useful because it means that you can have desktop ‘accessories’
available on your desktop all the time, but they do not need to be present as
full-size windows. Instead, you can keep your desktop tidy by having them
present as icons and only restoring them to their full size when you need to use
them. Being able to have a clock, calculator, notepad and calendar on your
desktop means that your Windows desktop can emulate a real desktop; you can
pause from your work on an application to do a quick calculation, check the time
or note an appointment in your calendar.
|
Activity
12
|
1.
Close the Calculator window.
2.
Under Accessories find ‘Address Book’. Click on ‘New’ and then
‘New contact’
3.
Enter details of a contact.
4.
Click on ‘OK’ if you want to save the address you have just entered
or ‘Cancel’ if you do not.
1.
The Address Book can be a very useful accessory
2.
10 Scrolling through a window
When you come to use applications running in windows, you
will often find that you cannot see all your work in the window at one time. You
therefore need a method of changing the part which is visible in the window.
This is called scrolling. You can experiment using the ‘(C)’ window.
|
Activity
13
|
1.
Open and shrink the size of the C window until all the icons no longer
fit in the window. What happens to the window borders?
2.
Try each of these operations and describe what happens:
a.
Click on the arrow icon at the bottom of the right-hand edge or at the
right of the bottom edge of the window. What happens?
b.
Drag the solid block between the two arrow icons. What happens?
c.
Click in the space between the arrow icon and the block. What happens?
When the contents of a window cannot all be seen at once,
Windows adds scroll bars and scroll arrows to one or two sides of the window.
You can use these to scroll the window contents, moving other areas into view. A
window with a vertical scroll bar looks like Figure 8.

Figure
8: Window
showing scroll bars when not all contents are visible
2.
(a) If you click on an arrow icon, the window contents scroll in small
steps.
(b) If you drag the block along the scroll bar, you can move straight to the
other end of the window contents, or to any place between the extremes. You have
full control.
(c) If you click in the space between the block and the scroll arrows, the
contents scroll by in jumps.
2.10 Using dialog boxes
So far you have given the computer instructions by choosing
options from menus and clicking on buttons and icons, but the computer has not
sent you any messages. When the computer needs to ask you a question or tell you
that you have made a mistake, it uses a dialog box. This is a special window
that appears just for as long as it is needed. It has text, buttons you can
click on, sometimes lists that you can choose from, and sometimes text fields
for you to type in.
|
Activity
14
|
1.
Double-click on Notepad icon in the C / Windows folder. This opens a text
editor i.e. a very simple word processor. Type some text, just your name will
do. Now click on the Close button. Sketch the dialog box that appears.
2.
What do you think will happen if you click on:
(a) Yes
(b) No
(c) Cancel?
3.
Click on No.
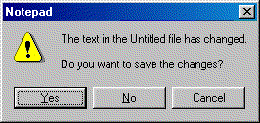
Figure
9: Dialog box
displayed when trying to close an unsaved file from Notepad.
1.
The dialog box looks something like Figure 9.
2.
(a) If you click on Yes, Windows will give you the chance to save your
document before closing the window.
(b) If you click on No, the window will be removed and your document will be
lost.
(c) If you click on Cancel, Windows will not close the document, and you will be
able to carry on working on it and save it if you want to.
2.11 The Control Panel
Many of the settings on your computer are changed from the
Windows Control Panel. Many of the items in the Control Panel are sensitive
system settings and should not be altered, however, others such as the
date/time, mouse and keyboard settings will need changing occasionally or as a
matter of personal choice.
|
Activity
15
|
Close all windows and
return to the desktop.
1.
Double-click on My Computer and then Control Panel which is found in the
box ‘Other Places’. Note the items in the Control Panel.
2.
Close the Control Panel and My Computer windows.
3.
Press the Start button. Select Settings and then from the sub-menu select
Control Panel. What do you notice?
4.
Select the Date/Time icon. Experiment with changing the settings in the
menus and boxes.
5.
When you have finished experimenting, set the date and time to the
correct values and click on OK, or just click on Cancel to restore the original
values updated to the current time.
The Control Panel can be accessed by either method. The Start
button is a useful shortcut to many programs on your computer. The Control Panel
can be changed to show a view by Category if you prefer.
|
activity
16
|
From the Control Panel
select the Mouse icon.
Adjust the
double-click speed setting by moving the pointer along the bar between Slow and
Fast. Experiment with these settings in the box marked Test.
When you have found a
setting you prefer select Apply from the bottom of the window, or if you prefer
the settings you had originally select Cancel.
Summary
In this section you have learnt about the main features of
Windows and practised using some of them. You will find that they quickly become
familiar and easy to use as you use the computer more and more.
Section 3
Using Computer Disks
Introduction
You will need to use floppy disks with your computer. Even
though your computer probably has a hard disk fitted, you will need to use
floppy disks to make copies of your work, to move any programs or data around
from one computer to another, and to load new programs onto the computer. In
this section you will learn how to ‘format’ a floppy disk under Windows i.e.
to prepare a disk for use, and how to make a copy of a disk and give it a name.
You will also set up a schedule for making back-up copies of your disks
regularly to make sure your work is always safe.
3.1 Preparing a disk to hold information
Before you can use a new floppy disk to hold any information,
or data, you need to prepare it. This preparation is called formatting. Usually
floppy disks are sold unformatted because different types of computer need the
disk to be formatted differently. Formatting prepares the tracks (lines) on the
disk to hold data in the way in which the computer is going to present the data.
A disk formatted on a PC is not the same as a disk formatted on a Macintosh,
although all the disks are identical when you buy them.
When you format a disk, any data already stored on it is
irretrievably lost. Although you need to format a new disk before you can use
it, be careful if you reformat a disk you have used before. Make sure you have a
copy of any information that you want.
Disks are denoted both by their physical size and also by the
amount of information they can store in bytes. One single byte of storage will
normally be enough to store a single letter of the alphabet. The standard type
of floppy disks used on a WindowsXP PC is 3.5inch 1.44Mb High Density. Mb stands
for Megabyte which is (approximately) 1 million bytes.
Some unformatted disks are labelled with capacities greater
than 1.44Mb. However, formatting a disk uses some of the available space and
after formatting you will have 1.44Mb of space on which to save your files.
You will need a new 3.5 inch floppy disk for the next
activity.
|
Activity
17
|
Put the disk into the
disk drive slot of your computer.
If it is a 3.5 inch
disk, there is an arrow moulded into the top left corner of the disk to show you
which way to put it into the drive. When inserting a disk into a horizontally
mounted drive, the arrow must be on the top of the disk and pointing towards the
disk drive slot as you insert it. When inserting disks into vertical slots care
should be taken to insert them gently in case they are the wrong way around.
1.
Push the disk into the drive until it clicks into place. A box will pop
containing a message asking you if you would like the disk formatted. If you
click ‘OK’, then the disk will be formatted. Alternatively go to 2.
2.
To format a floppy disk from Windows, you need to first open My Computer
on the desktop. The floppy disk drive has an icon marked ‘3 ½ Floppy (A:)’.
Right-click on the A: drive icon and select Format from the menu
The My Computer window displays all the drives available for
you to use. A: always denotes a floppy disk drive. On machines where only one
floppy disk exists ‘B’ is usually unused. Found on the front of machines,
these drives initially have no disks inside them but can have disks inserted at
will by the user. C: usually denotes a hard disk. These are located inside the
machine and are not easily removed. They do however store much more than floppy
disks can store and work much more quickly. Hard disk drives are the usual place
where the computer stores ‘Windows’ and application programs such as
Microsoft Word, a large word processing program. Floppy disks are often used to
store personal files. This is especially true if you are likely to be working on
several different machines and wish to transfer these files between machines.
D:, E: and other drive letters may be used to denote extra hard disk drives, CD
ROM drives or other storage media (including drives stored elsewhere to which
the computer is connected through a network).
|
Activity
17 continued
|
1.
The computer will display a window with options as shown in figure 10.
2.
If the disk you are formatting has been used before you may select Quick
Format (Erase), otherwise you will need to select Full.
3.
It is possible to name or label a disk by entering text in the label box.
Labels can be added later on, for now tick the no label box.
4.
Press the Start button to begin formatting the disk.

Figure
10: Window
for disk formatting options
|
Activity
17 continued
|
When formatting is
complete Windows displays a summary of the format operation. This displays how
much space is available the newly formatted disk.
Finally, remove the
disk and write on the label to identify the disk.
You now have a blank disk that is empty but is correctly
formatted for your computer.
3.2 Copying disks
You will often need to make copies of disks, for example:
·
when you have
bought a new program and want to make a copy to use, keeping your original copy
safe in case anything goes wrong with your working copy
·
to keep a secure
back-up copy of your work, in case anything happens to the copy you are working
on (strongly recommended)
·
to exchange files
between people working in a group.
When you copy information from one disk to another, the
computer reads the data from one disk, stores it in its memory, and then writes
it to the next disk.
If you have only one floppy disk drive of the appropriate
sort on your computer, you will have to:
·
put the disk you
want to copy from into the disk drive
·
tell the computer
to copy information from it
·
when the computer
displays a message telling you it is ready for the second disk, replace the disk
with the one you want to copy to.
Depending on how much free memory your computer has, you may
have to switch the disks in the disk drive several times as the computer copies
parts of the information stored. The next activity involves making a copy of the
disk that comes with this module. You will then be able to keep the original
disk safe and use the copy you have made to work on the module.
|
Activity
18
|
1.
In the lower left corner of the disk that comes with this module there is
a small plastic slider. Move this to uncover a hole. This will write-protect the
disk that comes with this course. Now put the disk into the floppy disk drive.
This will be referred to by the computer as the ‘source disk’, because it is
the source of the information you are going to copy.
2.
Put the source disk in the disk drive and keep your blank disk ready; you
will need it soon. The blank disk will be referred to by the computer as the
‘destination’ disk by Windows.
3.
With the source disk in drive A:, right-click on the A; drive in My
Computer. Select Copy Disk from the menu.
4.
A window appears for you to select which drives to copy from and to.
Unless you have more than floppy disk drive this will copy from and to drive A:.
Press Start.
5.
The computer begins to copy information from the disk into its own
memory, showing in the dialog box how it is progressing. When the computer is
ready for the second disk, it will display a dialog box asking you to insert the
destination disk. Click on OK when you have done so.
6.
When the copy has finished Close the copy disk window..
1.
Opening the slide protects the disk from accidental erasure just as
removing the tabs from a blank cassette prevents any new recording being stored
on that tape.
5.
The computer should now copy the information onto the destination disk.
This can be confirmed by double-clicking on the A: drive in My Computer to view
the contents of this disk.
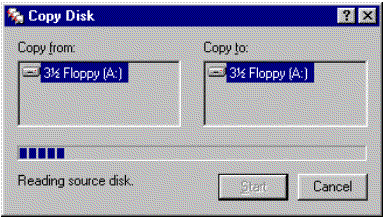
Figure
11: Copy Disk
dialogue
3.3 Keeping back-up copies of disks
You have already made a back-up copy of the module disk
during the activities in this section. It is important to keep a back-up copy of
anything important that you have on disk in case you lose or damage your working
copy. When you get a new program or some information from someone else, you
should always make a copy of the disk and work on that, keeping the original
disk safe as a back-up copy. When you do your own work with the computer, you
should make frequent back-up copies, which will be duplicates of your work, so
that you do not lose too much if something happens to your working copy.
|
Activity
19
|
Besides physical
damage to a disk, why would you back-up your information? Write down your
reasons below:
·
You may make a
mistake while working on your disk and perhaps delete some information you
wanted to keep.
·
You may make
changes to your work and then decide to go back to the original version.
·
You may lose
your working disk. (It is very easy to leave your disk in the computer when you
have finished working and to forget about it. If you are working somewhere other
than your own home, it may not be there when you come back.)
It is possible for
disks to become corrupted either because a computer virus has attacked the disk
or because the disk has been damaged by being dropped, being placed in an area
of excessive heat or near a magnetic field. Sooner or later this will happen to
you, your computer will report a disk error when you try to use one of your
disks. You may then not be able to get your information from the disk and will
need to use your back-up.
Even if you keep most
of your work on the hard disk of your computer, it is wise to keep back-up
copies of all your work and the programs you use (these will probably be as the
programs were supplied originally). It is not common for a hard disk to become
corrupted, but it does happen. It is possible for you to delete something by
mistake from the hard disk, too.
To be useful, back-up
copies of your own work need to be recent, so you will have to work out how
often you need to make back-ups. If you are working on a large document and
spend all day at the computer, making a back-up copy only once a week will not
be enough. You could lose a whole week’s work, and it is unlikely you can
remember everything you added during a week.
|
Activity
20
|
Consider the factors
that affect how frequently you should make back-up copies of your work. What
questions should you ask in deciding how frequently you should make back-up
copies.
You probably came up with some of the following questions:
·
How quickly do
you work?
·
How much work are
you prepared to recreate if necessary?
·
How difficult
would it be to recreate your work?
·
How inconvenient
would it be for you to have to redo work? (This may depend on how busy you are
and whether your time working on the computer is limited.)
·
How much time do
you spend working on the computer each day.
Thinking about these questions will help you decide how often
you need to make back-up copies. For example, if you work solidly on the
computer all week, you will need to make back-up copies every few hours. If you
have limited access to the computer, or little time to spend working on it, you
will not want to have to waste any of it duplicating work you have already done,
so you will want to make frequent back-ups. If you work very slowly with the
computer, perhaps thinking most of the time, and then typing a little, and you
print out your work at the end of each session, you may decide to make back-ups
only every day or so. How frequently do you plan to make back-up copies of your
work? Try to stick to your decision to make back-ups frequently. It is easy to
have good intentions but not to bother in practice. The first time you do lose
some of your work, you will realise how valuable the back-ups are.
In industries where computers are used all the time and to
store important information, a system of triple-level back-ups is often used.
This consists of using three, or more, disks in turn to make back-ups on
successive occasions. For example, if you decided to make a back-up each day,
you might use disk 1 on Monday, disk 2 on Tuesday and disk 3 on Wednesday. On
Thursday, you would use disk 1 again, overwriting the copy you made on Monday.
On Friday, you would reuse disk 2, and so on.
|
Activity
21
|
1.
What are the advantages of the three-disk system?
2.
What other precautions could you take to keep your back-up disks safe?
1.
The three-disk system offers extra security in two important ways:
If anything happens to the most recent back-up, it is possible to restore work
from the previous day’s back-up. Although a day’s work is lost, it is better
than having no back-up at all, or only an old one.
If you make a mistake during the day and do not notice it until after you have
saved the back-up, you can restore a version without the mistake. Even if you
fail to notice the error for two days running, it is possible to correct the
mistake with three back-ups.
2.
You could make two back-up copies at a time, so that if anything happened
to one disk you would still have the other. However, it is not particularly
likely that your working copy and your back-up copy will get lost or damaged at
the same time. A better precaution is to keep your back-ups and originals
separate. This will minimise the chances of both sets being damaged or lost at
the same time. If you keep three levels of back-ups, it is a good idea to keep
these disks separate too. Try to keep your sets of disks not just in different
disk boxes, but in different rooms or even buildings. Do not carry all your
back-ups and originals around with you. If you have to travel to use the
computer, you should keep at least two sets of back-ups so that you can carry
one with you and leave one at home.
3.4 Disk copying and the law
We have suggested that you should always make a copy of any
new program you buy and put the original disk away safely. However, you must
read the licensing conditions of new programs carefully and make sure that you
only make and use copies as you are allowed to. Generally, you are not allowed
to:
·
make copies to
give to someone else
·
use a program on
more than one computer at once
·
lend copies to
someone else to help them decide whether they want to buy the program
·
sell copies to
anyone else
·
copy the program
onto a network without permission from the software company that produced the
program.
You are allowed to:
·
remove your copy
of a program from one computer and then use it on another computer
·
make a back-up
copy in case your working copy is damaged.
If you want to use several copies of a program on a network,
you should apply to the software company for a site licence. You will probably
have to pay for this, and it will specify the number of copies you are allowed
to use.
If you break any of the conditions of the licensing
agreement, you may be prosecuted. The Federation Against Software Theft (FAST)
has the right to search computer installations to check that software is not
being illegally copied and used, and can impose large fines if it finds any
illegal use. Individuals can be fined too, so be careful.
|
Activity
22
|
Which of the following
do you think would be in breach of the licensing conditions of a piece of
software?
1.
Rachel has loaded a word-processing program on her portable computer and
typed in some reports. She gives the computer to her secretary to make
amendments to the report, using the program.
YES/NO
2.
Tony has two identical computers at home, one upstairs and one
downstairs. He has bought a copy of a flight simulator game and loaded it on
both computers.
YES/NO
3.
Alice’s mother wants to borrow a copy of the spreadsheet program Alice
uses. Alice makes copies of the disks and lends them to her mother. Her mother
uses the program for a week and then deletes the copies.
YES/NO
4.
Adrian is worried that his toddler may destroy the disks that hold his
database program. He makes 15 back-up copies and keeps some in his house, some
at work, and sends some to his father for safekeeping.
YES/NO
5.
Thomas has created a design for a garage using a drawing program. He
saves his design on a disk. His friend also wants to build a garage and asks if
he can borrow the design. Thomas lends him the disk with the design on it.
YES/NO
1.
Rachel is not breaking the law. She has installed a single copy of the
software on one computer; it does not matter who uses the computer.
2.
Technically, Tony is breaking the law. Although he is unable to use both
computers at once, he has installed the program on two computers when he is
allowed to install it on only one.
3.
Alice and her mother are breaking the law. Even though Alice’s mother
deletes the copies when she has finished evaluating them, she should not have
used them in the first place.
4.
Adrian is allowed to make as many copies for security as he wishes. He
may have difficulty convincing FAST that all his copies were kept for this
purpose, but he is not breaking the law if none of the extra copies is ever used
and he does not intend them to be used.
5.
Thomas can give the drawing he has created to anyone as long as he does
not also pass on a copy of the program. The data you create with a program is
not generally subject to any restrictions on distribution. (His friend would
need to have some software capable of understanding the diagram. He may even
need to have the same program.)
Summary
In this section you learned how to format a disk and make a
copy of it. You looked at why you need to make back-ups, and decided how
frequently you will do so. You are also able to abide by the law when making
copies of disks.
Section 4
Launching Applications
Introduction
Using Windows you will want to run, or ‘launch’,
application programs that have been purchased and installed on your computer.
4.1 Starting, finishing and minimising applications
To start, or launch, an application move the mouse over the
icon representing that application and double-click. Alternatively, use the
shortcut provided by Windows - the Start menu.
|
Activity
23
|
1.
Press the Start button and select the Programs sub-menu.
2.
Next find the icon representing the program Microsoft Word and click on
this icon.
3.
Wait for a while and the program should load and run in its own window.
4.
Activate the File menu and list below the options that you think are
general and may also exist in other application programs.
5.
Now activate the Help menu. List below the options that you think are
general and may also exist in other application programs.
6.
Using the familiar bar at the top left of the window close the
application down.
3.
All windows applications look and work in similar ways – this makes it
easier to learn a range of packages. Looking at the Word application you should
be able to recognise a familiar window with its control bar, menu, maximise and
minimise buttons. From the menu you should be able to activate the familiar help
system.
4.
In many application programs there is a File menu with the same options
that exist in this menu. Thus having learnt how to use one program many of the
skills are the same when using other programs. Some of the common options
include :-
New – this creates a blank sheet when starting a new report or letter,
Save – having created a document this stores it on disk,
Open – opens a document from disk for further editing,
Print – this prints a document out,
Print preview – this shows how the document will look when it is printed,
Exit – this closes the application down.
5.
Similarly, in most applications there is a ‘Help’ menu. Common
options here include:
·
Contents – this
gives an overview of the package
·
Search for help
on – this allows the user to look for help on a specific topic.
6.
Closing an application down will also take a short time. When an
application closes, all data from within that application will be lost unless
previously stored.
|
Activity
24
|
1.
Reactivate Word. Type in a few words and then instead of closing this
application minimise it.
2.
Activate the Microsoft Excel application using the Start button menu.
3.
Minimise the Excel application.
1.
When the program is minimised it will no longer be visible though it will
still be active in memory and all data within it will still be intact.
Minimising an application is much quicker than closing it but does not free up
the computer systems resources (e.g. memory) being used by that application.
3.
When both Word and Excel applications have been minimised they will be
represented by icons on the Taskbar.
Figure
12: Active,
yet minimised programs
|
Activity
25
|
1.
Reactivate the Word program by clicking on its icon on the Taskbar.
2.
Examine the words typed in.
3.
Restore Excel again by clicking on its icon on the Taskbar.
2.
When Word is reactivated it should still contain the text you typed into
it earlier.
3.
With Excel enlarged to its full size the Word window is again obscured.
4.2 Running multiple copies of an application
|
Activity
26
|
1.
From the Start menu run the text editor called Notepad. It can be found
by following Programs / Accessories / Notepad.
2.
Type a single line of text in the new window.
3.
Repeat steps 1 and 2 twice more.
3.
We may think that by running Notepad from the Start menu we are bringing
the program back so that we can use it. This is not the case. We are in fact
launching another copy of Notepad. The way to bring back a program is to click
on its icon the Taskbar.
We now have three copies of the Notepad program running in the computer’s
memory. This is wasteful of the computer’s resources. Each copy of the program
uses up some of the computer’s available memory. If the program had been a
larger application such as Word then running multiple copies of the same
application would waste vast amounts of memory. Eventually as the computer
starts to run out of memory it would slow down significantly and be incapable of
working with large data files (e.g. documents in the word processor). There are
almost no situations where running multiple copies of an application in memory
is advantageous and care should be taken to avoid doing this.
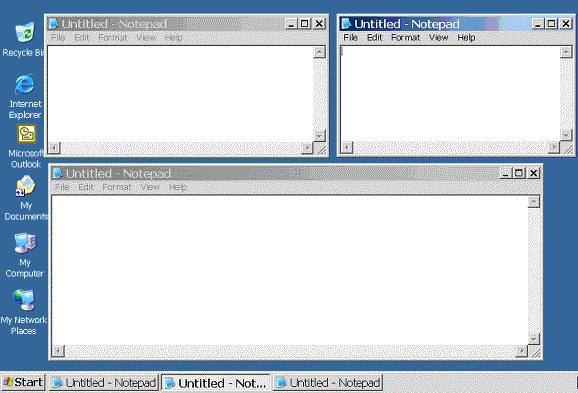
Figure
13: Multiple
copies of Notepad running in memory
|
Activity
27
|
Opening applications
without the Start menu.
1.
Double-click on My Computer, then double-click on C:
2.
Double-click on the folder called Windows.
3.
Locate the icon called Notepad (it may also be called Notepad.exe on some
computers).
4.
Activate the application by double-clicking on the icon.
|
activity 28
|
Close down ALL copies
of Notepad.
Summary
In this section you have learnt how to launch applications,
how to switch between applications and how to ensure that only one copy of each
application is active. Windows applications have many similarities and therefore
knowledge of one helps when you are learning others.
Section 5
Working with Files
Introduction
Information that you use with the computer is organised into
files. A file may be a letter, spreadsheet, drawing or other item of work that
you have created. In this section, you will learn how to handle files in
Windows, how to create, copy, rename and delete files, and how to find out
information about files.
Files are usually organised into groups in a system similar
to a filing cabinet in an office. You will look at filing structures in detail
in the next section. You will learn how to store and display a catalogue of
files in a directory.
5.1 What is a file?
When you begin work on the computer, you will want to save
your work so that you can use it again later, print it out, or store it for
future reference. Any saved piece of work is stored as a file. The type of
information held in the file depends on the sort of program you used to create
it. If you are using a word-processor, you will create a document file, such as
a letter, report or essay. If you are using a spreadsheet program, you will
create a spreadsheet file, and a database will create a database file. You may
also be able to create graphs from a spreadsheet and graph or report files from
a database.
The computer refers to each file by its own name. You will
need to give a file a name when you save it for the first time. You can reuse
this name the next time you save it if you want your new version to replace your
old version, or you can save the file with a new name to preserve the old
version.
Files are stored inside directories. A directory does not
store any data of its own, but holds files, and sometimes other directories.
Figure 14 shows a typical set of directories on someone’s computer disk. On
the left hand side is a picture of the directories. The directory ‘Windows’
is highlighted. On the right hand side is a list of files inside directory
‘Windows’.
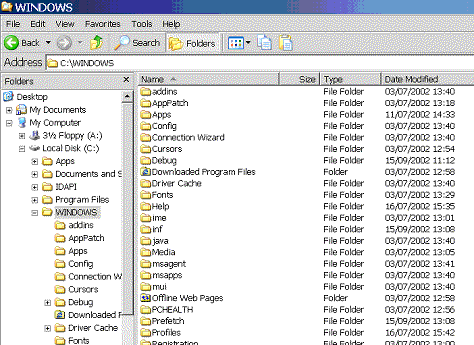
Figure
14:
Directories and files
You can think of a directory on a disk as similar to a folder
in a filing cabinet draw. You can store documents and sub-folders in it, and
keep your work organised by filing each document appropriately. Directories are
called Folders in Windows and the terms directory and folder are
interchangeable.
|
Activity 29
|
1.
Put your working copy of the module disk in the floppy disk drive of your
computer. Press the Start button and select My Computer..
2.
When the My Computer window is on screen, click on the icon for drive A:
This displays a catalogue of the disk contents.
3.
Next to the icon is a small cross, click on the cross.
4.
The Folders contained on drive A: are now also shown on the left hand
side, beneath the A: drive icon.
5.
Now click on the Access folder listed below the A: drive icon. This will
display the contents of the Access folder in the right hand window.
6.
From the Explorer toolbar select View and then select Details. The
contents of the Explorer screen should now look similar to figure 15.
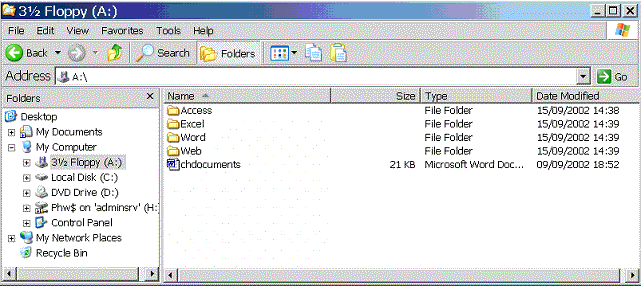
2.
The window on the right should show the contents of drive A:. This is the
highest level directory of the disk and is also known as the Root directory.
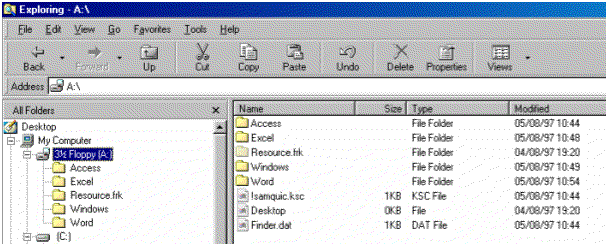
Figure
15: Root
directory
6.
Using Windows Explorer, you have control over the display of File Details
in the window on the right. Try displaying files by the other options available
in the View/Display menu. Showing file Details lists the following:
·
name of the file
·
the size of the
file
·
the type of the
file
·
the date and time
that the file was last changed.
Clicking on the Name,
Size, Modified headings in the right hand window will sort the file display.
File names and details and what they mean
When you did
Activity 29, you will have found that Windows Explorer can show you not just a
list of file names but also extra information about a file.
Directories and files have different icons as shown in Figure
16. (In fact there are several different kinds of file icons, but directories
are always the same.).

Figure
16: Directory
icon and file icon
In Windows a file has a name and (usually) an extension. The
file extension comes immediately after the file name, separated from it by a
full stop (.) and tells you what type of file it is (e.g. a word-processor
document). File extensions are sometimes connected directly with an application
ie .xls is a Microsoft Excel spreadsheet file.
Some icons are ‘ghosted’ to show that they are system
files. These are files and folders maintained by the computer and should not be
changed or moved.
Because folders on a disk are arranged in a hierarchical
fashion – i.e. each directory can have other directories branching off from it
– we refer to this structure as a ‘tree’. Remember that the first
directory of your disk is the root!
Figure
17: Typical
Windows directory tree
|
Activity 30
|
Look at the directory
tree for the A: drive above in Figure 17 and answer the following questions.
1.
Which items are directories?
2.
Are there any system folders?
3.
When was chdocuments last modified?
4.
How large is the file chdocuments?
1.
Directories are Access,Excel, Word, Web.
2.
No
3.
Finder.dat was last modified on 09/09/02 at 18:52.
4.
The file is 21K in size. K stands for Kilobytes.
Choosing file names and extensions
When you want to save a piece of work for the first time, you
will need to give a file name for it. File names may be up to 256 characters
long. However some systems such as Windows 3.1 cannot read files longer than 8
characters long. File extensions are usually three characters long. You can use
any of the letters from A to Z and any numbers from 0 to 9 in a file name. You
can also use the characters ! # $ % ( ) & – _ but you may not use any
spaces or the characters : * ? < > / \ The computer will not let you save
a file with a name that contains these ‘illegal’ characters. There are also
a few combinations of characters that you are not allowed to use as file names
as they are already being used for other purposes. These are:
AUX, COM1, COM2, CON, LPT1, LPT2, LPT3, PRN, NUL
You can give a file name in upper or lower case (capitals and
small letters).
There are many different file extensions for different types
of file. Those you are most likely to see early on in your work with the
computer are:
DOC for a word-processor
document file
TXT for a ‘pure’ text
file without any of the formatting provided by a word-processor
XLS for a spreadsheet
file produced by Microsoft Excel
MDB for a database file
produced by Microsoft Access
EXE for an executable
file (a file containing a program, which requires ‘executing’ so that you
can use it).
When you save or retrieve a file using an application program
(such as a word-processor or database), you will not need to specify the file
extension as it will be added automatically to the file name you give. This is a
good way for the computer to make sure that it always give files the right file
extension.
|
Activity 31
|
Tick which of the
following are acceptable file names?
JASLET.TXT
OK?.TXT
TG_LET.TXT
LetYoung.txt
LetYoung2.txt
CON.BAK
config.sys
let/1/ajs.txt
You should have ticked the following acceptable file names:
JASLET.TXT
TG_LET.TXT
LetYoung.txt
LetYoung2.txt
config.sys
The rest are not acceptable because:
OK?.TXT has the illegal
character ? in the name.
CON.BAK uses the illegal
name CON
let/1/ajs.txt uses the
illegal character /
5.2 Creating and storing a file
You can easily create a file of your own to store in a
directory; you use an application program supplied with Windows.
|
Activity 32
|
You are going to
activate a simple application program, create a file and save it onto your
floppy disk. This is a vital skill that you will use almost every time you use a
computer. You will require a blank floppy disk and you will need to make sure
that the disk has been formatted, is not write-protected (i.e. that the hole is
closed) and that it is in the disk drive.
1.
Run the Notepad application (Start button / Programs / Accessories)
2.
Display the Format menu. If there is no tick next to the Word Wrap item,
select it. If the tick is there press the Esc key to cancel the menu without
activating any item.
3.
Type some text, just a line or two will do. Do NOT press Enter (Return)
when you reach the right-hand margin – just carry on and see what happens.
4.
When you have typed some text, display the File menu and click on ‘Save
As’.
1.
The Notepad window appears.
2.
The Word Wrap option is what is known as a toggle. If it is OFF (not
ticked) then clicking it sets it ON (ticked), and vice versa.
3.
Because you ensured that Word Wrap was ON, when your typing reaches the
right hand margin of the window it automatically ‘wraps round’ to the
beginning of the next line.
4.
You will see a dialog box similar to Figure 18.
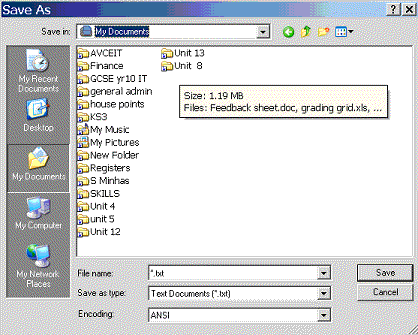
Figure
18: Save as
dialog box from Notepad
The Save As dialog box has several components:
·
A box for you to
type the name you want to use for the file.
·
A box showing the
currently selected folder.
·
A box listing the
files and folders already present in your current directory.
·
A box labelled
Save File as Type; this shows a file type, and has a button to the right for you
to click on to display a menu of the options available. You can save your file
as a text (.TXT) file, or as another type, in which case you will need to
specify a file extension when you choose the file name.
·
A Save button for
you to click on when you have chosen the file name and directory.
·
A Cancel button
for you to click on if you decide not to save the document.
·
To the right of
the current folder box is a button with an icon showing a folder and an up
arrow. This is a shortcut to the parent directory of the one you are currently
in.
·
To the right of
this is a shortcut button which selects the desktop as the destination of the
file save.
·
To the right of
this is a button for creating a new folder within the currently selected folder.
For now we will keep things fairly simple and save your file
on to your floppy disk.
|
Activity 32 Continued
|
1.
Click on the menu button next to the Save in box, and from the list which
appears choose ‘A:’ – the floppy disk drive.
2.
Enter a name for your file in the File name box making sure it meets the
rules shown above. Press the Save button.
1.
After a pause while the computer looks at your floppy disk, the directory
box changes to show the contents of your disk.
2.
You don’t need to include an extension, because like most programs
Notepad will add the appropriate one (.TXT) for you. The computer pauses again
while it writes your new file on to the disk. So long as this operation is
successful the dialog box then disappears. If an error message appears, check:
·
that your disk
HAS been formatted, is NOT write protected and IS in the drive
·
that the filename
you gave was in agreement with the rules above.
If it still won’t work,
keep calm and seek assistance!
5.3 Retrieving a file
On many occasions you will not be creating new files but will
wish to retrieve a file you have already created to make changes and
improvements to that file.
|
Activity 33
|
1.
Close the text editor you were just using by clicking on the close button
‘X’ in the top right of the window.
2.
Reactivate the text editor you have just closed. Load the file you
created in the last activity by:
·
selecting the
Open option from the File menu
·
selecting the
disk drive where the file was stored
·
selecting the
directory where the file was stored
·
double-clicking
on the correct file name
3.
Make a slight change to the text you originally typed in (e.g. add one
word), and then select File Save.
4.
Finally close the text editor down.
1.
Clicking on the button closes down the application associated with that
particular window. It is good practice to close all windows before you switch
off your computer.
2.
To load a file previously created, which you will need to do on a regular
basis, you will need to find the file. This will be easy if you practise the
following good file management techniques.
·
Label your disks
appropriately
·
Create
directories with suitable names
·
Store your file
on the appropriate disk and in the appropriate directory
·
Give your files
meaningful names (e.g. subject1_assignment3.doc).
3.
Selecting the Save option will store your new document with the same name
as before and on the same disk and location, so this time you will not be asked
for a name and location. This will overwrite, i.e. destroy, the old version and
replace it with the new file. If you want to keep the old and new versions then
use the Save As option instead and use a different filename.
5.4 Copying a file
You will often want to make a copy of a file, either copying
it onto a different disk using the same file name or making a copy on the same
disk with a different name. You may want to copy a file onto a different disk to
keep as a back-up copy, or to use on a different computer. You may want to make
another copy on the same disk if you want to make a modified version of the file
and keep your original as well.
|
Activity 34
|
First you will make a
second copy of a file on the same disk. You will need to put your working copy
of the module disk in the floppy disk drive of your computer. It must not be
write-protected.
This time we will not
use Windows Explorer.
1.
Place your floppy disk in the drive of your computer and double-click on
My Computer on the Windows desktop. Double-click on the A: drive, this will open
a new window on the desktop which displays the contents of the floppy disk.
Double-click on the Windows subdirectory of your course disk, you should see the
icon for the file File1.txt, and click on the file to highlight it. Now
right-click on the file, from the menu that is displayed select Copy.
2.
Right-click on an empty part of the same window on the desktop, it’s
title will likely be ‘A:\windows’. The same menu appears that we used for
copying the file, however, this time select Paste.
1.
Using My Computer will display the contents of Drives and Folders just as
Windows Explorer does, however using this method will open a new window for each
folder that you double-click. You can close the windows for parent directories
if they are not required without affecting the window you are interested in.
3.
Notice that Windows automatically adds the words ‘Copy of’ to your
file, this is because you cannot have two files with the same name in a folder.
If you were now to open the copy, ‘Copy of File1.txt’,
make some changes to it and then save it again, this would not affect
‘File1.txt’ at all.
Perhaps you are more likely to want to make a copy of a file
onto another disk. You will do this frequently to keep back-up copies of your
work.
|
Activity 35
|
1.
Put the module disk in the floppy disk drive of your computer. You are
going to copy a file from this disk onto the hard disk.
2.
Open a window for the floppy disk by double-clicking on My Computer and
the A: drive. And open the folder ‘Windows’.
3.
Now double-click on the C: drive in My Computer which will open a window
displaying the contents of drive C:.
4.
Notice that the Taskbar has a button for each window as it does for
applications.
Your screen should
look something like Figure 19.
Figure
19: File
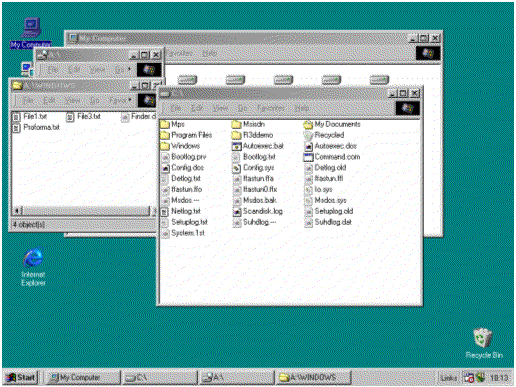
manager with windows for A: and C:
|
Activity 35 continued
|
5.
Click on the icon for File1.txt and then press and hold down the mouse
button while you drag the icon for File1.txt from the window for A: into the
window for C:.
6.
When the file icon is over a directory icon, you will see the icon
highlighted. You can move this so that it is over a directory icon in the drive
C: window. While it is not over a directory icon, no directories will be
highlighted. When you release the mouse button, the file will be copied into the
directory its icon is over. Copy the file into the disk C: root directory by
letting go of the mouse button when no directories are highlighted.
5.
When you select the file, its icon and file information is highlighted in
reverse colours.
6.
When you drop a file icon over a directory icon, the file will be copied
into the directory so long as they are on different disks. (Otherwise the file
will just be moved. To copy a file to a different directory on the same disk,
hold down Ctrl while you drag it.) This technique is called drag and drop. The
computer may first display a dialog box asking you to confirm that you want to
copy the file to the directory. When copying is finished, the directory window
may be updated to show the new copy of the file. (The display will only be
updated if a directory window for the directory you have used is already open on
the screen.)
You are now going to copy a file from one floppy disk onto
another floppy disk.
|
Activity 36
|
1.
Using My Computer open a window for the floppy drive.
2.
Select a file from your floppy disk and drag and drop the icon onto your
desktop. Wait for it to be copied.
3.
Take out your floppy disk and replace it with the disk where you want the
copy to be stored.
4.
Select the file from the hard disk and right-click on its icon, and then
select Cut from the menu. Right-click in the window for the floppy disk where
you want to copy the file to and select paste from the menu. Again, wait for it
to be copied.
If you have two floppy disk drives you can copy the file
directly from one disk to the other without using the hard disk drive at all.
Copying a group of files using Windows
You can easily copy a group of files at once using Windows.
|
Activity 37
|
Open a window
displaying the contents of the Business Skills floppy disk.
1.
Open the Windows folder.
2.
Click on an empty part of the window and keep the mouse button pressed
down.
3.
While keeping the mouse button pressed move the mouse within the window,
you will see a rectangle appear between the current position of the mouse and
the point at which you first clicked.
4.
Keeping the mouse button pressed, move the mouse so that all of the files
in the window are within the rectangle.
5.
All the files in the window should now be highlighted. Click with the
mouse on any of the files and keep the button pressed. Move the mouse around the
window while keeping the button pressed.
6.
Do not move the mouse outside of the window as we do not want to copy any
files at this stage. Release the mouse button and click on an empty part of the
window so that the files are no longer highlighted.
4.
Using the mouse a range of files have been selected for copying.
5.
All the highlighted files have been ‘picked up’ by the mouse.
6.
Releasing the mouse button ‘drops’ the files. Files will be copied to
where they are dropped.
|
Activity 37 continued
|
7.
Close the Windows window and open the folder called Excel.
8.
Now click on the top left or top file icon. Hold down the Shift key and
click on the bottom right or bottom file icon.
9.
Repeat step 8 with other files in the window.
10.
Now click on any file in the window. Hold down Ctrl key and click on
other files in the window.
11.
Still pressing the Ctrl key click on a file that is already highlighted.
8.
Selecting two files while pressing the Shift key will also select all the
files between them.
9.
Pressing the Ctrl key allows you to select multiple files that are not
next to each other in the window.
8.
Clicking on a highlighted file while pressing Ctrl will deselect it.
5.5 Renaming a file
You may sometimes need to change the name of one of your
files. For example, if you had two versions of a report you had typed called
REPT_NEW.TXT and REPT_OLD.TXT, and then created a third version, you might want
them to be called REPT_1.TXT, REPT_2.TXT and REPT_3.TXT. You can easily change
the name of a file.
|
Activity 38
|
You are now going to
change the name of Copy of File1.TXT to FILE2.TXT. You will need your disk
containing this file in the floppy disk drive.
1.
Right-click on the icon for Copy of File1.txt. From the menu that appears
select Rename.
2.
Type the name file2.txt in the field for the new name and click on OK.
What happens?
You will have found that the computer renames the file
without asking you to confirm it. The directory window is redrawn with the file
icon showing its new name.
5.6 Deleting a file
Sometimes you will want to delete files from the hard disk or
a floppy disk.
You are now going to delete one of the copies you have made.
When you delete a file from a floppy disk it is irretrievably lost, so make sure
you really do not want it, or have another copy, before you delete any of your
own files or programs.
When you delete a file from the hard disk of a Windows XP
computer it is first moved to the Recycle bin which is located on the desktop.
It is possible to restore a file to its original location from the Recycle bin
if you have deleted a file accidentally. However, it is necessary to empty the
Recycle bin regularly as files in the Recycle bin still take up computer hard
disk space. Once the Recycle bin has been emptied the files it contained are
permanently lost.
|
Activity 39
|
Highlight the icon for
file2.txt and choose Delete from the File menu. Alternatively you can highlight
the file and press the Delete key. What happens?
The computer may give you a chance to change your mind,
depending on how it is set up. To delete the file, click OK or press Enter to
confirm. When the file has been deleted, the directory window is redrawn to show
that it is no longer there.
|
Activity 40
|
1.
Copy a file from the windows folder of your Business Skills floppy disk
to the desktop.
2.
Now delete the file.
3.
Open the Recycle bin on the desktop, the file you just deleted should be
listed.
4.
Highlight the file you just deleted and from the File menu select
restore.
5.
Delete the file once again. Clean up your litter before you leave!
If you have not already done so you should delete the copy of
File1.txt which you created in the root directory of the C: drive in Activity
35.
5.7 Moving files in Windows
Windows offers a quick way to move files from one directory
or disk to another. This has the same effect as making a copy of a file and then
deleting the original.
·
To move a file to
a different directory on the same drive, just drag and drop as above. The file
is moved rather than copied.
·
To move a file to
a different drive, hold down the Shift key while you drag and drop.
Summary
In this section you have learnt about files and file names
and how to copy, rename and delete files. You will usually want to organise your
files into a directory structure to help you to keep track of your work and find
things easily. The next section explains how to create and manage directories
and gives you the chance to design a directory structure suitable for your own
work.
Section 6
Filing Structures
Introduction
Once you begin working seriously with Windows you’ll soon
find yourself creating many files – either on floppy disk or on the
computer’s hard disk.
Obviously, you need to organise files so that you can find
specific items easily at a later date. In this section you will learn how to
build and maintain filing structures to keep your work organised. A filing
structure is built from directories, subdirectories and files.
6.1 Designing a filing structure
If you just save all your files onto a floppy or hard disk
without thinking about their order, you will soon have just a long list of
files. This would be just as foolish as piling up all your papers on your desk
without making any attempt to keep them in order. To work efficiently, you need
to organise your work on disk just as you need to organise the paperwork on your
desk.
Windows lets you create directories in which to hold your
files. A directory is like a folder. In an office you can put several documents
inside a folder, and you can put several folders in a filing cabinet. On your
computer, you can build up a similar filing structure using several levels of
directories, i.e. you can have folders within folders (within folders)!
When you look in an office for a document, you first identify
the right filing cabinet, then the right drawer, then take out the correct
folder, and finally the document you want. On a computer, you would need to
identify the right disk, open the right sequence of directories and finally open
the file you want.
Figure 20 is an example. A solicitor keeps clients’ files
on floppy disks. She has a disk for divorce cases, on which she divides her
clients into husbands and wives. Within each of these directories, she has a
directory for each client. Within those directories, she has directories for
evidence and for correspondence with the client. These directories contain text
documents.
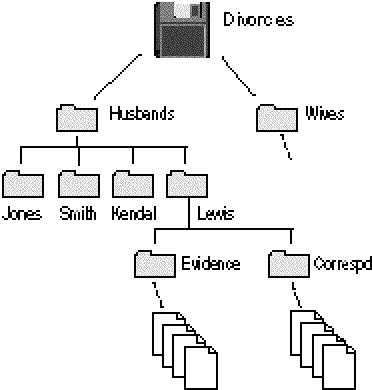
Figure
20: A filing
structure
Figure 20 illustrates only one husband’s (Lewis) complete
directory. Each of the wives’ and other husbands’ directories would also
contain subdirectories called Evidence and Correspd, and each of these would
contain documents.
|
Activity 41
|
Imagine you are
publishing a weekly student newspaper. You have a floppy disk for each issue. On
each disk, you want your filing structure to include:
·
adverts for
accommodation, pubs, and others
·
main stories
·
news items on
different academic departments
·
regular items
including editorial, reviews of videos, books and records, coming events, and
competitions (chess, crossword, etc.).
Sketch a possible
filing structure.
Here is one possibility.
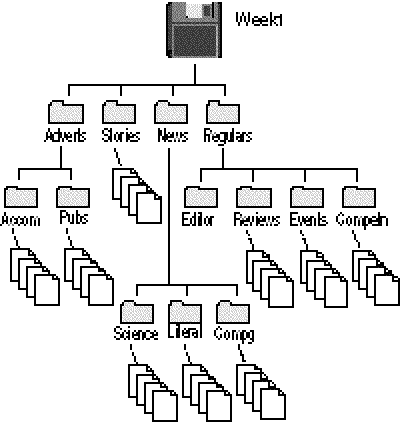
Figure
21: A filing
structure for Activity 41
Yours may be different, but as long as you have followed the
basic principles of grouping materials sensibly and dividing the whole into
directories and subdirectories it is probably just as good.
Creating a directory structure
Once you have designed your structure, you need to create it.
As you begin to create, move, copy and delete directories, you will, inevitably,
have to move up and down the directory structure. For example, you may create
your first directory in the root directory of a disk. If you want to create
another directory inside this one, you will first have to open this directory
and tell the computer you want to create the next one inside it. These points
will become clearer once you try creating directories and moving around the
structure.

Figure
22: Windows Explorer
In Figure 22, you can see an example of the window that
appears when the Windows Explorer application is running. Note that by default
icons are shown in the right hand window. This can be changed by accessing the
following icon and its menu from the toolbar in Figure 22a. Note that clicking
details shows the maximum amount of text information about a file.
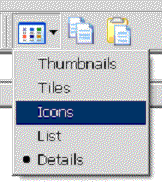
Figure
22a: file
display details
The title bar indicates the drive and the directory being
viewed. The main window is split into two halves; the window on the left shows
the drives and folders of the computer filing system and the window on the right
shows the sub folders and files within the currently selected folder. Either
side may have scroll bars so you can move up and down the window when there are
too many items to see all at once.
In the example above the window on the right displays the sub
folders and files of the directory on the C: drive. The folders in the left hand
window that contain sub folders have a ‘+’ sign next to them. Notice that
the icon for the currently selected folder is slightly different from the
others. It shows an opened folder.
|
Activity
42
|
You are going to
create a directory, called mydir, in the root directory of the module disk.
1.
Insert your course disk in drive a: and start the Windows Explorer
application from the Start button / Programs/Accessories menu (or hold down the
Windows key and press E).
2.
Click on the A: drive to highlight it.
3.
Click on the word File on the menu bar, look down the menu displayed
below File and click on the option New.
4.
From the sub menu select Folder.
5.
A new folder will appear in the right hand window and is called New
Folder. The name is highlighted for you to enter a new name of your choice.
6.
Type mydir and press Enter.
When you create a new directory, the window is redrawn to
show the new directory. You are not asked to confirm that you want to create the
directory.To place a new directory inside mydir (i.e., create a subdirectory),
you first need to open mydir. Remember, creating a New Folder always creates the
new directory immediately inside the highlighted directory.
You are now going to create a directory inside mydir, then
another inside that, and then return to the root directory to create another
directory that will be at the same level as mydir in the filing structure. This
structure is shown in Figure 23. .(though your disk probably has additional
directories in the root apart from mydir and anotherd).
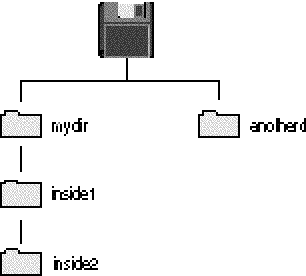
Figure
23: The
filing structure to be created
|
Activity 43
|
1.
Click on the ‘+’ to the left of the A: drive in the left hand window.
The display expands to show the folders in the root directory of A:.
2.
Click on the ‘mydir’ folder in the left window. The right hand window
will change to show the contents of ‘mydir’, as we have just created the
directory the window will be empty.
3.
Now create a new directory called ‘inside1’.
4.
In the left window click on the ‘+’ next to mydir to expand the
display. Click on ‘inside1’ to make it the currently selected folder.
5.
Create a new folder called ‘inside2’.
6.
Click on mydir in the left window. Create a new folder called ‘anotherd’.
2.
Notice that the mydir folder icon changes to an open folder.
6.
The Windows Explorer application should now look similar to Figure 24.
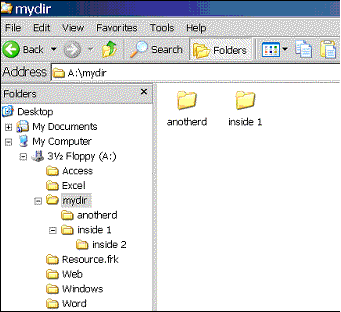
Figure
24.
|
Activity 44
|
Creating folders can
be created without Windows Explorer.
1.
Minimise the Windows Explorer window.
2.
Double-click on the My Computer icon on the desktop and then on the A:
drive icon.
3.
Double-click on the ‘mydir’ directory. This is the folder you have
just created in Windows Explorer.
4.
Click on the File menu in the A:\mydir window and select New and then
Folder from the sub menu.
5.
Name the new folder ‘evenmore’.
6.
Restore the Windows Explorer application by clicking on its button on the
Taskbar.
Windows Explorer will display the ‘evenmore’ folder you
have just created in the ‘mydir’ folder. Using either method to create
folders achieve exactly the same result, it is a matter of personal choice which
one you use.
6.2 Some searching operations in Windows
Windows also offers a Search option, from the Start button
menu, which searches for files and can select several files at once. The Search
option is extremely versatile, it will search several different directories or
even a whole disk.
|
Activity 45
|
1.
Making sure that your module disk is in drive a:, press the Start button
and select Search and then For Files or Folders.
2.
This displays a dialog box like that in Figure 25. Click on All files and
folders.
3.
The All files and folders box has a ‘Look in’ drop-down menu. Select
drive A:
Figure
25: Search
dialog box
You can search by:
·
all or part of a
file name
·
a word or phrase
in the file
·
more advanced
options – there is a small box marked Include Subfolders for example
|
Activity 45 continued
|
You can use Search to
find just one file, or find several files by using a ‘wildcard’ (a * in the
file name) which will match files with a range of names. Try looking for a
single file first.
3.
In the All or part of the file box enter file1.txt. If the Include
Subfolders box is not checked, check it now by clicking it.
4.
Click Search.
5.
Try the search again, using a wildcard: type *.*in the Named field. This
means ‘any filename, any extension’. What do you expect will happen? Click
on Find Now and see whether you are right.
3.
When you search for file1.txt, the computer searches for this file on the
module disk in drive a: and, when it finds it, opens a window showing the full
name of the file, including the directories you have to open to find it.
4.
When you search using a wildcard, the computer finds all the matching
files and directories and then lists them in the window it opens. These may be
held in several different directories. In practice, to be useful a wildcard will
usually need to be a bit more selective than *.* was, as in the next activity.
Once files have been found it is possible to open them by
double clicking them.
|
Activity 45 continued
|
6.
You can open the Search facility from the tool bar in Windows Explorer.
Hold down the Windows key and press the E key.
|
Activity 46
|
With the module disk
in drive a:, change to the a: drive in Windows Explorer by clicking on it.
Click the Search
magnifying glass icon and click on Documents (wordprocessing ...etc .) Type the
in the box.
This will search for
all files with ‘the’ in their title and will look only on the the A: drive.
1.
What happens?
2.
How do you think this may be useful?
1.
All the files with ‘the’ in the title are selected and their icons
are shown highlighted.
6.3 Exploring different ways to view directories and files in
Windows
You have already looked at directories several times and seen
that they contain files and/or further directories. You have also seen that
folders do not always contain files and subfolders, they may be empty.
Windows offers several ways of presenting information about
the contents of a directory; you may sometimes want to look at the information
in a different way, or sort the files in the directory into a different order.
Because the ease of use of Windows is so heavily dependent on
the appearance of the screen, it is not surprising that Windows offers you so
much control over the screen display.
You can modify how Windows Explorer and screen windows
present information to you through the View menu. The View menu has many useful
options for the different display of information.
The next activity gives you the chance to experiment with
some of the display options under the View menu.
|
Activity
47
|
Open Windows Explorer
and make A:\Excel the current folder.
From the view menu
select the following and notice the changes in the right hand window.
1.
Thumbnails
2.
Tiles
3.
Large Icons.
4.
Small Icons
5.
List
6.
Details
These options affect the type of icon that is displayed for
files and folders and the amount of information that is shown.
From the View menu select Arrange Icons and the following
submenu options
7.
by Name
8.
by Type
9.
by Size
10.
by Date
These options affect the order in which the icons are sorted.
From the view menu select as Webpage. Highlight files in the
right hand window and view the information displayed.
The menu bar in all windows has the View and Arrange Icons
options for changing the way in which files are displayed.
Summary
In this section you have learned about file structures and
directories, and have learnt how to manage files and directories to help you
keep your work well organised.
This section and the previous section are closely linked. You
have covered a lot of ground, the material is very important and you will often
use these techniques. As you find real uses for the tasks you have learned to
perform, you will find that they become more meaningful and easier to remember.
Section 7
Computer Viruses
Introduction
In one sense a virus is just another computer program.
Whereas other programs, when they run, perform a function for the user, a
virus’s main purpose is to make copies of itself – just like biological
viruses. Unfortunately, viruses don’t just make copies of themselves, they do
other things too. Most of the things they do are relatively harmless, like
putting up a message saying ‘Your computer is stoned’. (In fact, far more
trouble is caused by so-called ‘bugs’ in legitimate programs!) Although many
viruses are harmless, there are enough dangerous specimens in circulation for
you to need to know what to do to either avoid them or ‘disinfect’ your
disks and computer. A serious virus ‘attack’ could mean losing all the work
you have done on the computer!
7.1 Types of virus
There are three basic types of virus: file viruses, boot
sector viruses and macro viruses.
·
File viruses
attach themselves to executable and command files (.EXE and .COM files). Your
word-processing application, or your accounts package, is an executable file.
File viruses change an instruction at the beginning of an .EXE or .COM file so
that when you try to run it, the computer jumps to the virus and executes that
first, copying the virus into memory. Another instruction then sends the
computer back to the application to continue the execution of the program you
thought you were going to run. To a user, the delay is unnoticeable.
·
Boot sector
viruses work similarly: the virus modifies the special area called the ‘boot
sector’ on the hard or floppy disk. When you turn on the machine (or press
Alt-Ctrl-Del to reboot), the computer loads the virus code into memory and
executes it before continuing to start up, apparently as normal.
·
Macro viruses can
be found in Microsoft Word and Excel documents. Word and Excel have a
programming language included that is used to combine long series of operations
into a single button press or menu item. Commands available to macros include
changing your document or even deleting files from your computer. As a security
measure Word and Excel give the user the option to disable all macros.
Getting ‘infected’
Any file that is created on another computer and transferred
to your computer can be the source of a virus. It is not always possible to
guarantee that the user of the other computer takes the same care to prevent
computer viruses as you do. One of the easiest ways for a computer to get
infected is by downloading files from the internet where the source of the file
cannot be guaranteed as safe. Files sent as e-mail attachments can also contain
viruses, however, it is important to note that the e-mail message itself cannot
contain a virus, it is the file attachment that should be checked.
Another way for a computer to get infected is for you to
leave a floppy disk infected with a boot sector virus in the machine’s floppy
drive. When the machine is switched on or rebooted, the message:
Non-system disk or
disk error
Replace and press any
key when ready
appears on-screen. In a millisecond, the virus has been read
out of the floppy’s boot sector into the computer. The fastest infecting
viruses will then infect every executable file you open. So, you should
|
|
never
leave a disk in a machine’s floppy drive
|
|
when you turn off or on, or reboot, or leave the computer.
Remember that viruses have to get into your computer in the
first place; they arrive attached to other software. Computers have been
infected by files downloaded from the Internet, and by floppy disks from all
kinds of sources; friends, magazines, and even, on occasion, commercial
software.
The easiest way to get a floppy disk infected is to put it
into a drive of a computer that you haven’t first checked for viruses. This
could mean any computer, so always check the state of any machine you are going
to work on.
7.2 Prevention
Prevention is better than cure. Some simple prevention rules
for anyone using a personal computer are:
1.
Any floppy disk should be write-protected before it is inserted in a disk
drive. Slide open the write-protect window on 3.5 inch disks.
2.
Find out if the computer you are going to use has up-to-date anti-virus
software. (You may need to ask for help with this.) Use this software to scan
for any viruses on the machine. If the machine does not have anti-virus software
or if it is out of date, use a different machine.
3.
Scan your write-protected disk for viruses before doing anything else.
4.
If you work on a computer at home, follow the same procedure there that
you would do at work or at college, or anywhere else. Disks taken from one
computer to another should always be treated as dangerous; follow steps 1 to 3.
5.
If at work or college, etc., report suspicious behaviour to the
appropriate technical or support staff. If routine tasks cause unexpected
results, a scan for viruses should be one of the follow-up actions.
6.
Develop a routine for backing up clean copies of software and data.
Back-ups are critical, but if you’ve had a virus attack, you must scan the
back-ups before you use them to make sure they’re clean.
7.
Use virus scanning software to check e-mail attachments before you open
them. If you do not have virus checking software and you receive an e-mail with
an attachment from an unknown source do not open the file attachment until you
can verify who it is from. If in doubt delete the attachment without ever
opening it.
8.
If you have your own computer but do not have an up-to-date copy of
anti-virus software, think about investing in one.
Anti-virus software
There are two types of anti-virus software, scanners and
check-summers.
Scanners do precisely that: they scan files and memory for
viruses. Most scanners do this by ‘pattern-matching’. The majority of
viruses have recognisable ‘signatures’ in their code, which can be compared
to a database of such signatures which forms part of the scanning software.
Because, sadly, new viruses are being written all the time, it’s critical to
ensure that scanners are updated regularly.
It makes sense to have an anti-virus package that scans files
automatically when you go to open them, even if this entails a little extra
waiting time.
Check-summers compile a database of ‘check-sums’ so they
can tell afterwards if executable files are modified. This approach has
limitations. If your system is already infected with a virus when you install
the check-summer, the program will log as normal the infected version of the
files. Some commercial software packages write user configurations to executable
files; the check-summer will flag such changes as abnormal.
Generally, the best approach is one that combines the two
types: the check-sum provides a check on specific files or infections by unknown
viruses, while the scanner can identify what’s infecting your system so you
can tell what kind of damage you’re likely to have to clean up.
Windows adds another problem. In case of infection, you need
to be able to shut the machine off and reboot from a write-protected floppy
disk. Whatever happens, you can’t run Windows from a floppy. So any anti-virus
package must include utilities you can run under DOS in a crisis. Ideally, you
should check your system every time you start it up.
7.3 Getting rid of viruses
The natural reaction when you discover that either your
computer or your disk has a virus is to panic. Don’t. Carefully work out a
plan before you do anything that might spread the virus. If you are at work or
college, or elsewhere, find and inform the appropriate authority. If you
discover the problem at home, or have a PC at home that may be infected, use a
(legitimate) copy of anti-virus software, carefully following its instructions,
to disinfect your PC.
Generally, to disinfect your PC, you will need to ‘boot
up’ a clean machine; that means you will need a write-protected system floppy
disk. (A system disk is one with your CONFIG.SYS and AUTOEXEC.BAT files on it,
plus whatever utilities the anti-virus software has suggested you include on
it.) Most anti-virus packages include creating this disk as part of the
installation routine. If you haven’t already got a clean system disk you
should create one as soon as possible.
Summary
An awareness of viruses is just as important in protecting
your work as is keeping up-to-date back-ups. You need to know:
·
how to minimise
the risk of infection
·
how to detect
infection
·
how to deal with
infection if it occurs.
Section 8
Changing Your Windows Settings
Introduction
Once you are using the computer frequently and confidently,
you may find that there are some settings or options you make every day and that
you would like to be automatic when you turn on the computer. You can make
settings and save these changes so that they are used each time you run Windows.
If you are using a computer on a network it may take its
settings from a central ‘server’ computer rather than storing them on its
own disk. In this case you may be able to change settings as described in this
section, but you may not be able to preserve your settings between work sessions
as they will be lost when Windows is closed down. Some networks preserve your
‘user profile’ on the server and your setting will be the same whichever
computer you use to work on.
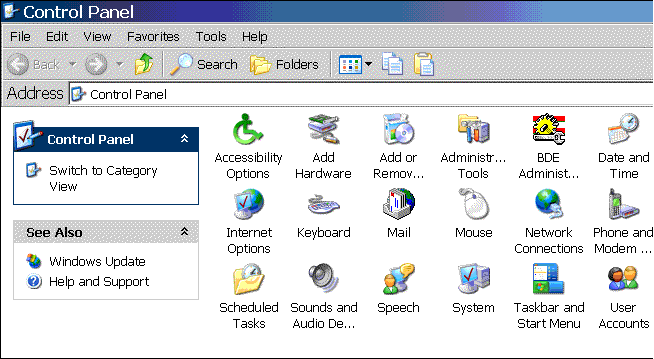
Figure
26: Windows
Control Panel
8.1 Controlling Windows Control Panel
There are many settings that you can customise in Windows to
make the computer easier to use. To customise the settings, you need to use the
Control Panel program.
Do not change any settings made within the Control Panel
unless you know what you are doing; these control the hardware and software the
computer expects to find and changing settings incorrectly can cause your
computer to cease working correctly.
|
Activity 48
|
1.
Double-click on the My Computer icon and then the Control Panel link.
2.
Place the mouse pointer each icon in turn and look at the status line at
the bottom of the window. This gives a brief explanation of what each program
does.
3.
Write a list of the icons you can see.
The Control Panel window will look something like Figure 26.
The icons may include the following:
These icons are for programs that change user settings:
Date/Time
Changes the date and time of your system clock
Mouse
Changes the settings of your mouse
Keyboard
Specifies the keyboard repeat rate and delay
Display
Changes the colours used by Windows, the patterns on your desktop and
screensaver options.
Regional Settings
Changes the symbols and formatting options used by your computer.
Sounds
Assigns sounds to computer events.
The following affect important hardware and software settings
of the computer and should not be altered without knowledge of what you are
doing.
Add New Hardware, Add/Remove Programs, Fonts, Modems,
Network, Passwords, Printers, System, Users
Date/time program
This program lets
you change the date and time of the system clock.
|
Activity 49
|
Double-click on the
Date/Time icon and experiment with the dialog boxes that appear.
1.
Double-click on the Date/Time icon and experiment with the dialog boxes
that appear.
2.
Before exiting make sure the date and time are correct.
2.
Every time you save a file the computer records the system date in order
to tell which files are newer than others. Always ensure your system date and
time is correct.
Mouse program
The Mouse program lets you control the speed at which the
pointer moves and how quickly you have to give two clicks for Windows to
register a double-click.
|
Activity 50
|
1.
Double-click on the Mouse icon.
2.
Experiment with altering the speed of the mouse and the double-click
speed. Any changes take effect immediately, so it is easy to experiment.
3.
To test the double-click speed, try double-clicking on the folder next to
the double click speed dialogue. The folder will open after a successful
double-click.
4.
Click on the Pointers Options tab. Turn on Pointer Trails. What does this
do? Why might you want to use it?
5.
Why do you think it may be useful for someone to swap the left and right
buttons on a two-button mouse?
4.
Pointer Trails makes the mouse leave a trail of ‘shadow’ arrows as it
moves. This facility may be useful if you have difficulty seeing the mouse, for
example on the LCD display of a portable computer.
5.
A left-handed person or someone with impaired hand movement or missing
fingers may want to swap the mouse buttons to make the mouse easier to use.
Display program
The Display program lets you change the appearance of the
desktop and choose a screen saver (a moving picture or pattern displayed on the
screen when you have not used the mouse or keyboard for a while).
|
Activity 51
|
1.
Double-click on the Display icon.
2.
Select the Screensaver tab. Inside the Screen Saver box, find the Name:
box and click on the right hand side button; choose a screen saver from the list
and click on Preview.
3.
A screen saver helps preserve your screen by preventing a static image
being burned into the screen if you leave the display the same for a long time.
(This is not a danger with LCD screens.)
4.
Select the Background tab. Change the Wallpaper settings, they will be
previewed in the screen above.
4.
The pattern you choose for wallpaper is repeated across the background of
the screen.
Keyboard program
The Keyboard program lets you control how long you have to
hold down a key before the computer assumes you want to repeat the character,
and the rate at which the character is repeated again if you keep the key held
down. This is a particularly useful setting to control if you have difficulty
using the keyboard. You can only use this program if the computer is fitted with
a keyboard that can vary its speed.
|
Activity 52
|
1.
Double-click on the Keyboard program icon.
2.
Experiment with setting the delay (how long the computer waits before
first repeating a character) and the interval (how long it then waits between
repeats).
Begin with slow speeds
and increase them gradually.
Summary
In this section you have learned how to set up the computer
as you want it. You can make many choices about the appearance of the screen,
the keyboard repeat rate and other elements when using Windows. However,
although Windows will preserve the settings you have made from one day to the
next, if anyone else makes any changes, then their settings will override your
earlier ones and you will need to make them again when you next use the
computer.
Make a note of any settings you would like to make (or
change) and anything else you wish to remember or discuss from your work on this
section.
Unit Summary
In this unit, you have learnt some basic skills in setting up
your computer, opening applications, using and copying disks and protecting
against virus damage. You are now in a position to investigate some software
programs in the next three units.
Session Two: Spreadsheets and Excel
Session Three: Using Databases and Access
Sessions Four: Word Processing with MS Word |